Difference between revisions of "How to Use SkyDrive"
m (Format corrected) |
m (in-use removed) |
||
| (9 intermediate revisions by the same user not shown) | |||
| Line 5: | Line 5: | ||
Moreover, you are not attached to your fixed IT fascilities and can have access to required resources on the go: on a variety mobile devices operating systems, and smartphones. One part of those resources, drives, comes to be more handy for individual users. Microsoft SkyDrive is among the most important ones. [[Category:Computer Skills]] | Moreover, you are not attached to your fixed IT fascilities and can have access to required resources on the go: on a variety mobile devices operating systems, and smartphones. One part of those resources, drives, comes to be more handy for individual users. Microsoft SkyDrive is among the most important ones. [[Category:Computer Skills]] | ||
== Steps == | == Steps == | ||
# Sign into Windows Live using your Live ID. | # Sign into Windows Live using your Live ID. | ||
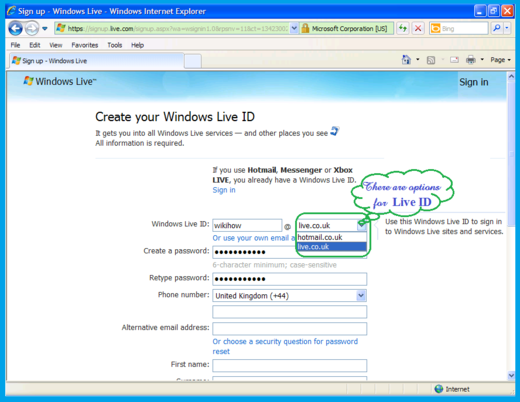
#*If you do not have an ID, one free will be offered to you to sign up and join. Just go to windows.live.com Windows Live | #* If you do not have an ID, one free will be offered to you to sign up and join. Just go to windows.live.com Windows Live [[Image:Wikihowsky00 1.png|center|520px|skydrive]] | ||
# Select your desired "Live ID". In the next stage you have the option to choose your ID. | |||
#* That could be at the "live dot" or "hotmail dot" followed by your country URL extension. In the US it follows by "com" only.[[Image:Wikihowsky02.PNG|center|520px|skydrive]] | |||
[[Image: | # Follow simple procedure to finish getting your ID. | ||
# Select your desired "Live ID". In the next stage you have the option to choose your ID. | #* Now you are in your personal "Live" page.[[Image:Wikihowsky03.PNG|center|520px|skydrive]]. | ||
#*That could be at the "live dot" or "hotmail dot" followed by your country URL extension. In the US it follows by "com" only. | #* Small dialogue shows finishing update. At any time you can launch SkyDrive by Clicking on "Open your SkyDrive folder." | ||
# Look at the range of services available. | |||
# Go to top left corner "Windows Live." | |||
[[Image:Wikihowsky02.PNG| | #* From the drop down menu select "All services."[[Image:Wikihowsky04.PNG|center|520px|skydrive]] | ||
# Follow simple procedure to finish getting your ID. | # Find SkyDrive at the bottom of the page. | ||
#* Now you are in your personal "Live" page. | #* Also note that there are other free services available for personal productivity.[[Image:Wikihowsky05.PNG|center|520px|skydrive]] | ||
# Observe that it immediately creates your sky drive on the cloud. | |||
#* You have place holder for your personal documents, pictures and public items. At the top there are options for creating on-line (that is, on-cloud) Office documents for productivity. Please also refer to [[Backup Your Important Files Using Hotmail Skydrive|Backup Your Important Files Using Hotmail SkyDrive]]. | |||
[[Image:Wikihowsky03.PNG| | #* Click on the "Get the SkyDrive application for your PC or Mac."[[Image:Wikihowsky06.PNG|center|520px|skydrive]] | ||
# Look at the different flavours of SkyDrive available for different devices. | |||
#* That helps you to have access to your cloud storage on the SkyDrive from different pieces of device you might use at any place.[[Image:Wikihowsky07.PNG|center|520px|skydrive]] | |||
#*Small dialogue shows finishing update. At any time you can launch SkyDrive by Clicking on "Open your SkyDrive folder." | #* In the next stage click on "Download."[[Image:Wikihowsky08.PNG|center|520px|skydrive]] | ||
# Look at the range of services available. | # Look at the bottom of your Browser. | ||
# Go to top left corner "Windows Live." | #* Allow the install to "Run."[[Image:Wikihowsky10.PNG|center|520px|skydrive]] | ||
# | #* Installation proceeds.[[Image:Wikihowsky12.PNG|center|520px|skydrive]] | ||
*From the drop down menu select "All services." | # Click on "Get Started" button. | ||
#* Fill the form according to your acquired Live ID.[[Image:Wikihowsky13.PNG|center|520px|skydrive]] | |||
# Note that the "cloud hard disk" has been installed on your computer. | |||
[[Image:Wikihowsky04.PNG| | #* There is no need to change its location on a safer place in your computer. No failure on your computer will touch that drive; except that you delete its content.[[Image:Wikihowsky14.PNG|center|520px|skydrive]] | ||
# Find SkyDrive at the bottom of the page. | # Click on "Next" button | ||
#*Also note that there are other free services available for personal productivity. | #* Update your other device pieces in sharing SkyDrive.[[Image:Wikihowsky15.PNG|center|520px|skydrive]] | ||
# Click on "Done" button. | |||
#* Your SkyDrive is on your device.[[Image:Wikihowsky161.png|center|520px|skydrive]] | |||
[[Image:Wikihowsky05.PNG| | # Click on the small ''caret'' on the quick launch. | ||
# Observe that it immediately creates your sky drive on the cloud. | #* It shows the hidden icons; among them SkyDrive icon. Moving green line means SkyDrive being updated.[[Image:Wikihowsky17.PNG|center|520px|skydrive]] | ||
#*You have place holder for your personal documents, pictures and public items. At the top there are options for creating on-line (that is, on-cloud) Office documents for productivity. Please also refer to [[Backup Your Important Files Using Hotmail Skydrive|Backup Your Important Files Using Hotmail SkyDrive]]. | # Utilize your SkyDrive for ''share'' and ''team work''. | ||
#*Click on the "Get the SkyDrive application for your PC or Mac." | #* Among your documents you have a place for "Public" files. Put some files there. Open the "Public" to see them. In the Demo picture, there are two files. | ||
#*One is actually SkyDive executable file that you can download and run to install SkyDrive. In the demo it is shown to the reader that it is even possible to upload exe files in the SkyDrive. It is important for the team works to have such a capacity for beta testing and other purposes. | |||
#* Other file is just a notepad. It is a draft of this article to back it up. | |||
[[Image:Wikihowsky06.PNG| | #* Select this one by ticking the box in front of its name. If you like to embed it in your Blog or other Internet pages click on "Embed" on the right side pane to get the embedding HTML code. | ||
# Look at the different flavours of SkyDrive available for different devices. | #* If you like to share it, then click on "Share" in the right side panel.[[Image:Wikihowsky19.PNG|center|520px|skydrive]] | ||
#*That helps you to have access to your cloud storage on the SkyDrive from different pieces of device you might use at any place. | # Look at the widget that opens. It has different options. | ||
#* You can send an email as a link to this file. | |||
#* You can post it to Facebook or Tweeter or LinkedIn. | |||
[[Image:Wikihowsky07.PNG| | #* Sharing link could allow people only "View" your file without being able to modify it. | ||
#*In the next stage click on "Download." | #* Sharing link could allow both "View" and "Edit" of the file. | ||
#* Besides, being a "Public" file allows people to search it and if found through the Internet search engines to be viewed by the public. You can put your file in non-public folders if you want it to be of access of you-only or you and your team-only.[[Image:Wikihowsky20.PNG|center|520px|skydrive]] | |||
#* For any reason, you can shorten the link address to be more digestable, by clicking on the "Shorten" button. You can put that address in your browser right now and find out a draft of this article.[[Image:Wikihowsky21.PNG|center|520px|skydrive]] | |||
[[Image:Wikihowsky08.PNG| | # Establish your team. | ||
# Look at the bottom of your Browser. | # Click on "SkyDrive" command at the top. | ||
#*Allow the install to "Run." | #* From the drop-down menu select "Groups."[[Image:Wikihowsky22.PNG|center|520px|skydrive]] | ||
#* Group introductory page opens. Click on "Create a Group."[[Image:Wikihowsky23.PNG|center|520px|skydrive]] | |||
# Fill the "Create Group" form. | |||
[[Image:Wikihowsky10.PNG| | #* Select a name for your group/team. It automatically check and informs you if that name has not been used already for any other group. | ||
#*Installation proceeds. | #* Add people from your contact list, or just type each email address followed by a comma. Click on theCreate" button.[[Image:Wikihowsky24.PNG|center|520px|skydrive]] | ||
# Look at your ''Group'' page. | |||
#* Any email created will be sent to all group, automatically. | |||
[[Image:Wikihowsky12 | #* Any member can use the group email to send messages to all group.[[Image:Wikihowsky26.PNG|center|520px|skydrive]] | ||
# Click on "Get Started" button. | # Invite People to join to your group. | ||
#*Fill the form according to your acquired Live ID. | #* Send invitation to each candidate member.[[Image:Wikihowsky27.PNG|center|520px|skydrive]] | ||
#* Once they joined then individual mail is not necessary.[[Image:Wikihowsky28.PNG|center|520px|skydrive]] | |||
# Start to create shared facilities for the group. | |||
[[Image:Wikihowsky13.PNG| | #*You can have a shared calendar that is visible to every member and can be edited by each member.[[Image:Wikihowsky29.PNG|center|520px|skydrive]] | ||
# Note that the "cloud hard disk" has been installed on your computer. | #*You can create a shared OneNote for the group that could be edited in "''real time''". | ||
#*There is no need to change its location on a safer place in your computer. No failure on your computer will touch that drive; except that you delete its content. | #*Also you are able to create other Microsoft Office files without having to have one in your own personal computer possession. They are free on-line Office productivity tools that can be edited individually or by a geographically scattered team. | ||
[[Image:Wikihowsky14.PNG| | |||
# Click on "Next" button | |||
#*Update your other device pieces in sharing SkyDrive. | |||
[[Image:Wikihowsky15 | |||
# Click on "Done" button. | |||
#*Your SkyDrive is on your device. | |||
[[Image:Wikihowsky161.png| | |||
# Click on the small ''caret'' on the quick launch. | |||
#*It shows the hidden icons; among them SkyDrive icon. Moving green line means SkyDrive being updated. | |||
[[Image:Wikihowsky17.PNG| | |||
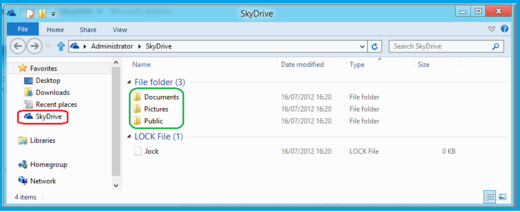
# Utilize your SkyDrive for ''share'' and ''team work''. | |||
#*Among your documents you have a place for "Public" files. Put some | |||
#*One is actually SkyDive executable file that you can download and run to install SkyDrive. In the demo it is shown to the reader that it is even possible to upload exe files in the SkyDrive. It is important for the team works to have such a capacity for beta testing and other purposes. #*Other file is just a notepad. It is a draft of this article to back it up. | |||
#* Select this one by ticking the box in front of its name. If you like to embed it in your Blog or other Internet pages click on "Embed" on the right side pane to get the embedding HTML code. #*If you like to share it, then click on "Share" in the right side panel. | |||
[[Image:Wikihowsky19.PNG| | |||
# Look at the widget that opens. It has different options. | |||
#*You can send an email as a link to this file. | |||
#*You can post it to Facebook or Tweeter or LinkedIn. | |||
#*Sharing link could allow people only "View" your file without being able to modify it. #*Sharing link could allow both "View" and "Edit" of the file. | |||
#*Besides, being a "Public" file allows people to search it and if found through the Internet search engines to be viewed by the public. You can put your file in non-public folders if you want it to be of access of you-only or you and your team-only.[[Image:Wikihowsky20.PNG| | |||
#*For any reason, you can shorten the link address to be more digestable, by clicking on the "Shorten" button. You can put that address in your browser right now and find out a draft of this article. | |||
[[Image:Wikihowsky21.PNG| | |||
# Establish your team. | |||
# Click on "SkyDrive" command at the top. | |||
#*From the drop-down menu select "Groups." | |||
[[Image:Wikihowsky22.PNG| | |||
#*Group introductory page opens. Click on "Create a Group." | |||
[[Image:Wikihowsky23.PNG| | |||
# Fill the "Create Group" form. | |||
#*Select a name for your group/team. It automatically check and informs you if that name has not been used already for any other group. | |||
#*Add people from your contact list, or just type each email address followed by a comma. Click on theCreate" button. | |||
[[Image:Wikihowsky24.PNG| | |||
# Look at your ''Group'' page. | |||
#*Any email created will be sent to all group, automatically. | |||
#*Any member can use the group email to send messages to all group. | |||
[[Image:Wikihowsky26.PNG| | |||
# Invite People to join to your group. | |||
#*Send invitation to each candidate member. | |||
[[Image:Wikihowsky27.PNG| | |||
#*Once they joined then individual mail is not necessary. | |||
[[Image:Wikihowsky28.PNG| | |||
#Start to create shared facilities for the group. | |||
#*You can have a shared calendar that is visible to every member and can be edited by each member. | |||
[[Image:Wikihowsky29.PNG| | |||
#*You can create a shared OneNote for the group that could be edited in "''real time''". | |||
#*Also you are able to create other Microsoft Office files without having to have one in your own personal computer possession. They are free on-line Office productivity tools that can be edited individually or by a geographically scattered team. | |||
# Look at the top of the page. | # Look at the top of the page. | ||
== Related How To's == | |||
*[[How to Backup Your Important Files Using Hotmail Skydrive|How to Backup Your Important Files Using Hotmail Skydrive]] | |||
Latest revision as of 18:30, 13 March 2014

Cloud computing means using off-site computer infrastructures that can be leased or freely used to provide for computer requirements of individuals and organisation. That infrastructure includes all resources of an in-site computer fascility; that is, processors, physical memories (RAMs) and storages known as drives.
It helps, as is believed, to reduce costs of maintenance and upgrading of in-site fascility lower on the idea of use it when you need and use it more when you need more.
Moreover, you are not attached to your fixed IT fascilities and can have access to required resources on the go: on a variety mobile devices operating systems, and smartphones. One part of those resources, drives, comes to be more handy for individual users. Microsoft SkyDrive is among the most important ones.
Steps
- Sign into Windows Live using your Live ID.
- If you do not have an ID, one free will be offered to you to sign up and join. Just go to windows.live.com Windows Live
- If you do not have an ID, one free will be offered to you to sign up and join. Just go to windows.live.com Windows Live
- Select your desired "Live ID". In the next stage you have the option to choose your ID.
- That could be at the "live dot" or "hotmail dot" followed by your country URL extension. In the US it follows by "com" only.
- That could be at the "live dot" or "hotmail dot" followed by your country URL extension. In the US it follows by "com" only.
- Follow simple procedure to finish getting your ID.
- Now you are in your personal "Live" page..
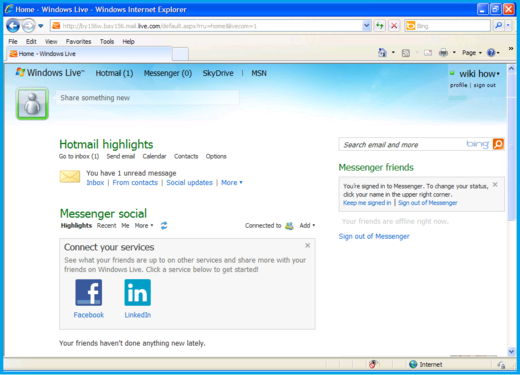
- Small dialogue shows finishing update. At any time you can launch SkyDrive by Clicking on "Open your SkyDrive folder."
- Now you are in your personal "Live" page.
- Look at the range of services available.
- Go to top left corner "Windows Live."
- From the drop down menu select "All services."
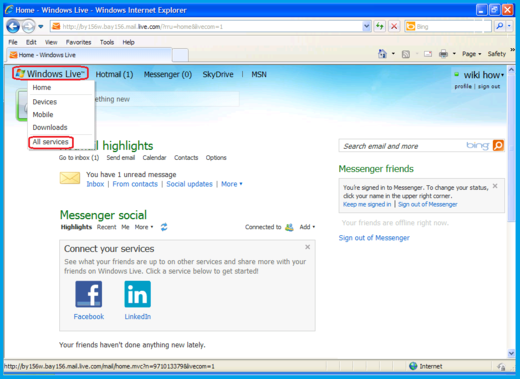
- From the drop down menu select "All services."
- Find SkyDrive at the bottom of the page.
- Also note that there are other free services available for personal productivity.
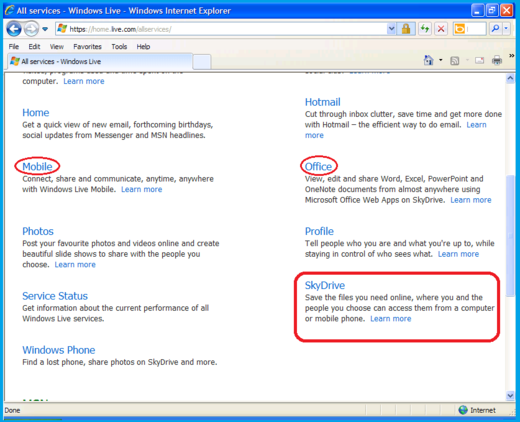
- Also note that there are other free services available for personal productivity.
- Observe that it immediately creates your sky drive on the cloud.
- You have place holder for your personal documents, pictures and public items. At the top there are options for creating on-line (that is, on-cloud) Office documents for productivity. Please also refer to Backup Your Important Files Using Hotmail SkyDrive.
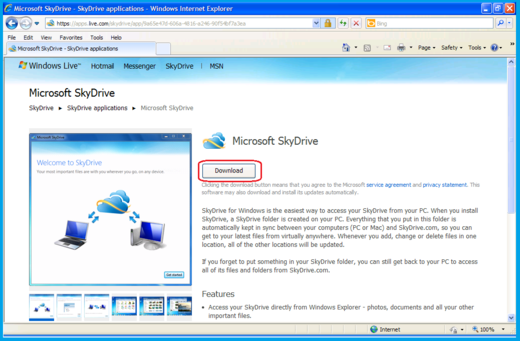
- Click on the "Get the SkyDrive application for your PC or Mac."

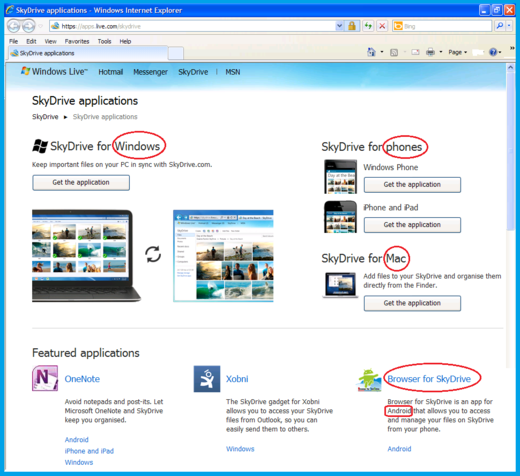
- Look at the different flavours of SkyDrive available for different devices.
- That helps you to have access to your cloud storage on the SkyDrive from different pieces of device you might use at any place.
- In the next stage click on "Download."
- That helps you to have access to your cloud storage on the SkyDrive from different pieces of device you might use at any place.
- Look at the bottom of your Browser.
- Allow the install to "Run."

- Installation proceeds.
- Allow the install to "Run."
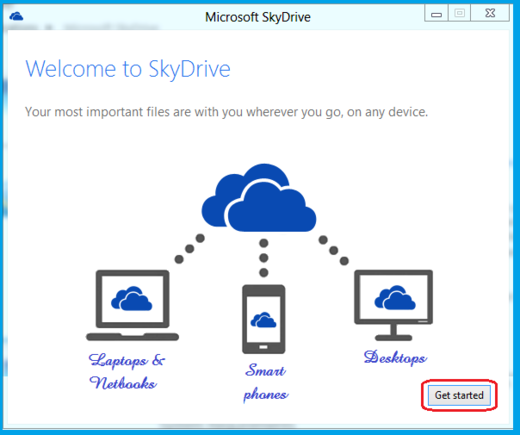
- Click on "Get Started" button.
- Fill the form according to your acquired Live ID.

- Fill the form according to your acquired Live ID.
- Note that the "cloud hard disk" has been installed on your computer.
- There is no need to change its location on a safer place in your computer. No failure on your computer will touch that drive; except that you delete its content.
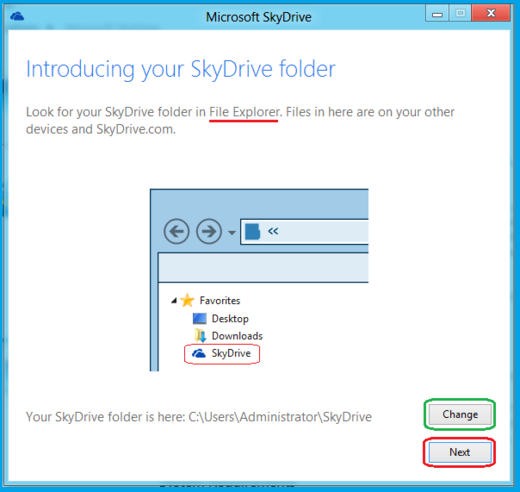
- There is no need to change its location on a safer place in your computer. No failure on your computer will touch that drive; except that you delete its content.
- Click on "Next" button
- Update your other device pieces in sharing SkyDrive.
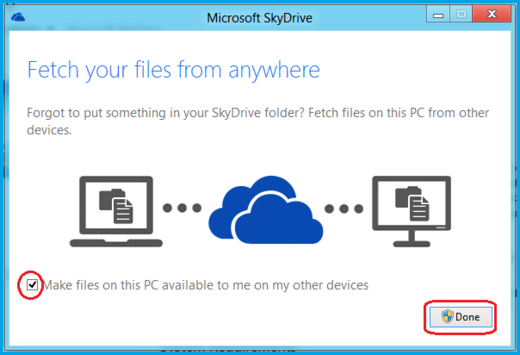
- Update your other device pieces in sharing SkyDrive.
- Click on "Done" button.
- Your SkyDrive is on your device.
- Your SkyDrive is on your device.
- Click on the small caret on the quick launch.
- It shows the hidden icons; among them SkyDrive icon. Moving green line means SkyDrive being updated.
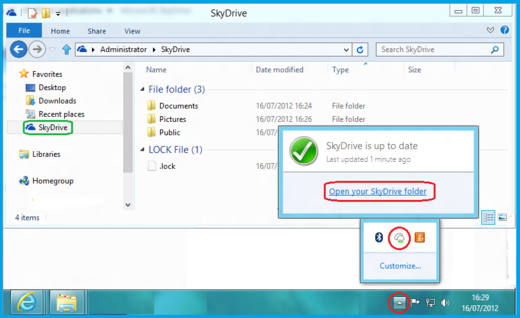
- It shows the hidden icons; among them SkyDrive icon. Moving green line means SkyDrive being updated.
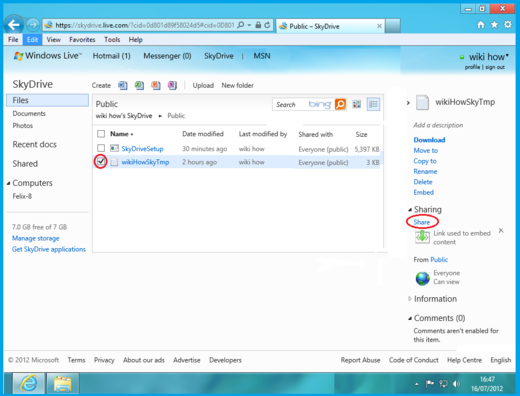
- Utilize your SkyDrive for share and team work.
- Among your documents you have a place for "Public" files. Put some files there. Open the "Public" to see them. In the Demo picture, there are two files.
- One is actually SkyDive executable file that you can download and run to install SkyDrive. In the demo it is shown to the reader that it is even possible to upload exe files in the SkyDrive. It is important for the team works to have such a capacity for beta testing and other purposes.
- Other file is just a notepad. It is a draft of this article to back it up.
- Select this one by ticking the box in front of its name. If you like to embed it in your Blog or other Internet pages click on "Embed" on the right side pane to get the embedding HTML code.
- If you like to share it, then click on "Share" in the right side panel.
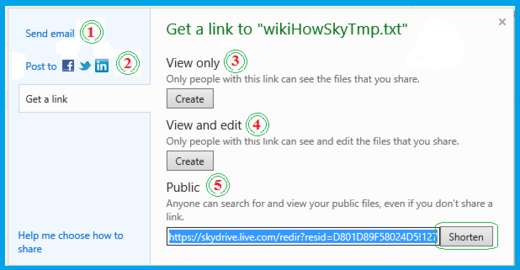
- Look at the widget that opens. It has different options.
- You can send an email as a link to this file.
- You can post it to Facebook or Tweeter or LinkedIn.
- Sharing link could allow people only "View" your file without being able to modify it.
- Sharing link could allow both "View" and "Edit" of the file.
- Besides, being a "Public" file allows people to search it and if found through the Internet search engines to be viewed by the public. You can put your file in non-public folders if you want it to be of access of you-only or you and your team-only.
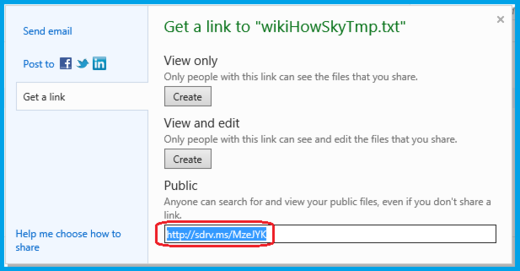
- For any reason, you can shorten the link address to be more digestable, by clicking on the "Shorten" button. You can put that address in your browser right now and find out a draft of this article.
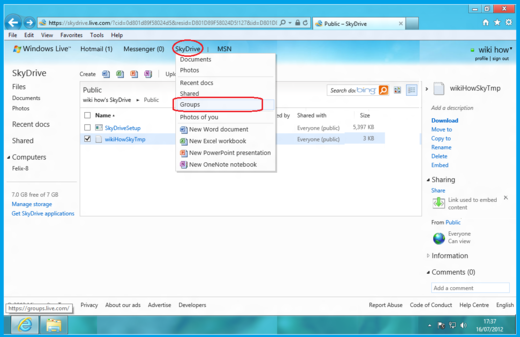
- Establish your team.
- Click on "SkyDrive" command at the top.
- From the drop-down menu select "Groups."
- Group introductory page opens. Click on "Create a Group."

- From the drop-down menu select "Groups."
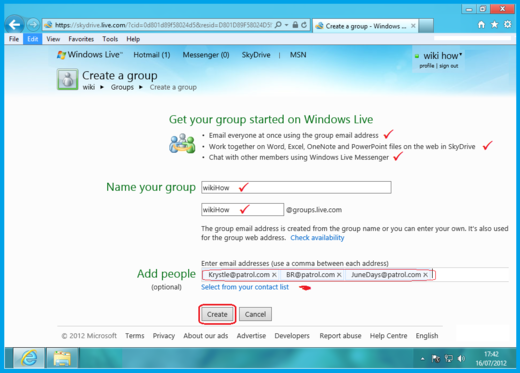
- Fill the "Create Group" form.
- Select a name for your group/team. It automatically check and informs you if that name has not been used already for any other group.
- Add people from your contact list, or just type each email address followed by a comma. Click on theCreate" button.
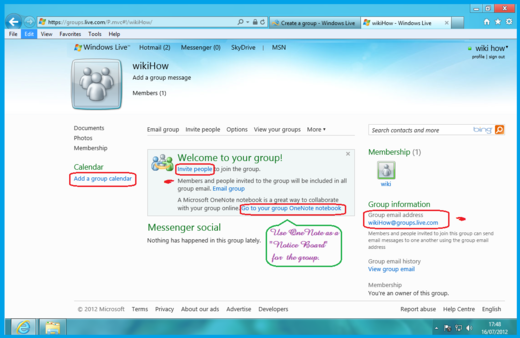
- Look at your Group page.
- Any email created will be sent to all group, automatically.
- Any member can use the group email to send messages to all group.
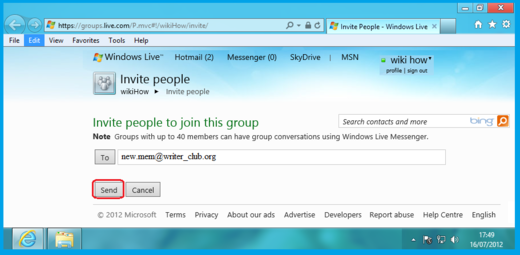
- Invite People to join to your group.
- Send invitation to each candidate member.
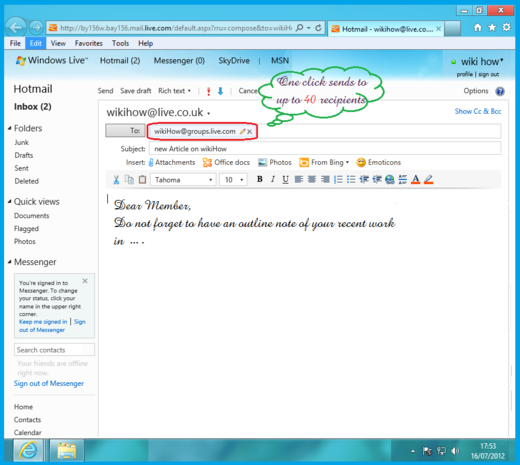
- Once they joined then individual mail is not necessary.
- Send invitation to each candidate member.
- Start to create shared facilities for the group.
- You can have a shared calendar that is visible to every member and can be edited by each member.

- You can create a shared OneNote for the group that could be edited in "real time".
- Also you are able to create other Microsoft Office files without having to have one in your own personal computer possession. They are free on-line Office productivity tools that can be edited individually or by a geographically scattered team.
- You can have a shared calendar that is visible to every member and can be edited by each member.
- Look at the top of the page.


